Enable GZIP compression
GZIP compression reduces the size of pages in the web server before they are sent to the site visitor’s browser. This saves a lot of traffic and makes pages load and display much faster. Then the web browser of site visitors automatically unpacks pages. Compression and unpacking take only a split second.
How to Check if GZIP Compression is Enabled
Online: Use the online gzip test to check whether your page is compressed.
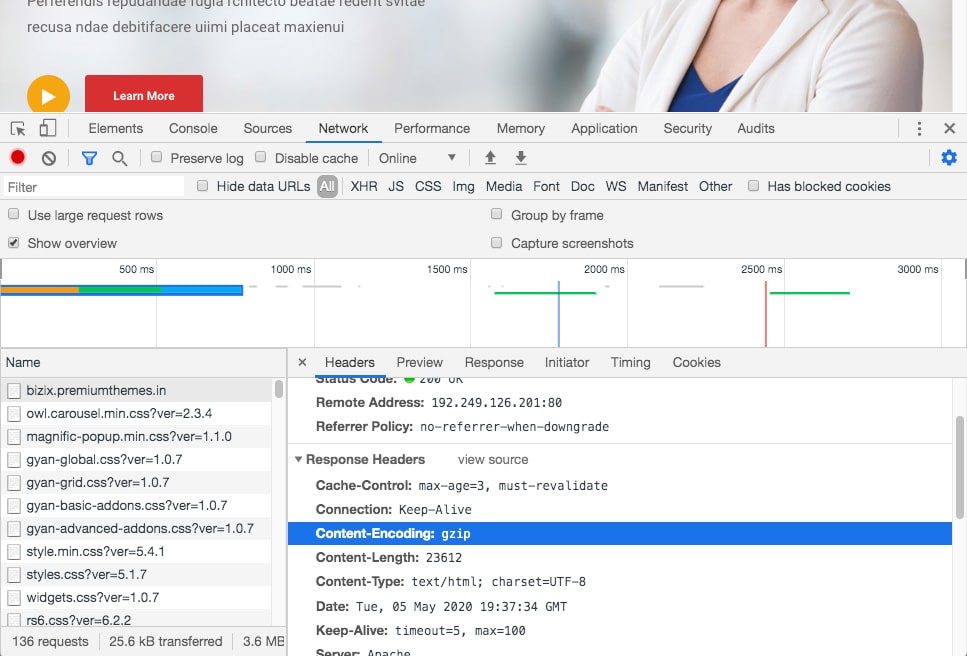
In your browser: In Chrome, open the Developer Tools > Network Tab (Firefox/IE will be similar). Refresh your page, and click the network line for the page itself (i.e., www.google.com). The header “Content-encoding: gzip” means the contents were sent compressed.
How to Enable GZIP Compression
If you don’t have GZIP compression enabled, there are a couple of ways you can go about enabling it on your web server.
Enable GZIP with WordPress Plugin
The first and one of the easiest is by using a caching plugin that supports enabling GZIP. WP Rocket for example adds GZIP compression rules in your .htaccess file automatically using the mod_deflate module. W3 Total Cache also has a way to enable this for you under it’s performance section. Alternatively, you can use the caching plugin W3 Total Cache. When installed, under Performance > Browser Cache, you can find a check box to add HTTP compression to your WordPress website.
Even though these are plugins, this still relies on permissions to modify files on your webserver. If your caching plugin doesn’t have permission, you will need to ask your host or use a snippet of code below.
Enable GZIP on Apache
The second way to enable Gzip compression is by editing your .htaccess file. Most shared hosts use Apache, in which you can simply add the code below to your .htaccess file. You can find your .htaccess file at the root of your WordPress site via FTP.
Important: Make sure mod_filter is loaded on your server, otherwise the AddOutputFilterByType directive will not work and could cause a 500 error. We recommend checking your error logs if you have any issues with the code below.
# Compress HTML, CSS, JavaScript, Text, XML and fonts
AddOutputFilterByType DEFLATE application/javascript
AddOutputFilterByType DEFLATE application/rss+xml
AddOutputFilterByType DEFLATE application/vnd.ms-fontobject
AddOutputFilterByType DEFLATE application/x-font
AddOutputFilterByType DEFLATE application/x-font-opentype
AddOutputFilterByType DEFLATE application/x-font-otf
AddOutputFilterByType DEFLATE application/x-font-truetype
AddOutputFilterByType DEFLATE application/x-font-ttf
AddOutputFilterByType DEFLATE application/x-javascript
AddOutputFilterByType DEFLATE application/xhtml+xml
AddOutputFilterByType DEFLATE application/xml
AddOutputFilterByType DEFLATE font/opentype
AddOutputFilterByType DEFLATE font/otf
AddOutputFilterByType DEFLATE font/ttf
AddOutputFilterByType DEFLATE image/svg+xml
AddOutputFilterByType DEFLATE image/x-icon
AddOutputFilterByType DEFLATE text/css
AddOutputFilterByType DEFLATE text/html
AddOutputFilterByType DEFLATE text/javascript
AddOutputFilterByType DEFLATE text/plain
AddOutputFilterByType DEFLATE text/xml

# Remove browser bugs (only needed for really old browsers)
BrowserMatch ^Mozilla/4 gzip-only-text/html
BrowserMatch ^Mozilla/4\.0[678] no-gzip
BrowserMatch \bMSIE !no-gzip !gzip-only-text/html
Header append Vary User-Agent
Enable GZIP on NGINX
For Nginx users, the following snippet can be added to the nginx.conf file in order to enable Nginx Gzip.
gzip on;
gzip_disable "msie6";
gzip_vary on;
gzip_proxied any;
gzip_comp_level 6;
gzip_buffers 16 8k;
gzip_http_version 1.1;
gzip_types text/plain text/css application/json application/x-javascript text/xml application/xml application/xml+rss text/javascript;
Enable GZIP on IIS
If you are running on IIS, there are two different types of compression, static and dynamic. We recommend checking out Microsoft’s guide on how to enable compression.
